Washers from Razors
How To Make .004 Inch Stainless Steel Washers
By Chris Crawford (October, 2001)
I've changed my methods for building washers somewhat, and I've created a video detailing how I currently make them. You can check it out on the Video Tutorials page.
I’ve put this tutorial together to demonstrate how one can make stainless steel washers out of razor blades to be used in folding knives. I’ve developed this method based on ideas and suggestions which have come from talking to and visiting with other local area knife makers.

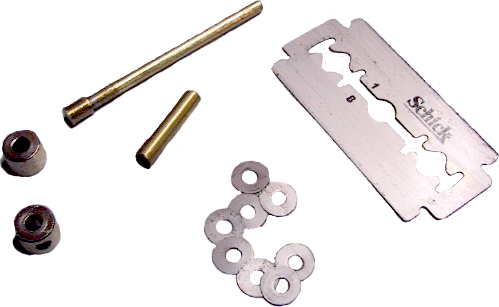
(1) The first picture shows the jig and parts needed when making the washers. I’ll explain what the parts are as we get to them.
(2) The second picture shows a close up of the jig. The jig consists of two plates of metal with three small holes and one large hole drilled through both plates. I have the bottom plate glued to a piece of wood but this wouldn’t be as necessary if you used a thicker piece of metal. Start by placing the two plates together and putting pins in the two outside holes. The pins help to keep everything lined up. The small center hole is the hole we will use to punch out the center hole of the washer. I use 3/32 inch pivot pins, so this center hole is a 3/32 inch hole. The larger hole is used to punch out the rest of the washer. I’m using a 1/4 inch hole here. Use a pair of needle-nose pliers to break the razor in half.
(3) Slide the razor between the two plates. I usually mark the razor off with a dot where I want the center hole to be.
(4) Take the flat end of an old drill bit and grind a slight angle to it. This angle helps give the bit a cutting action when punching through the razor. Put the end of the drill bit in the hole, and give the other end a whack with your hammer. If all goes well, you should have a perfectly round hole punched out of the razor. Keep in mind that the drill bit needs to be the exact size of the punch holes in the jig.
(5) This picture shows the razor with the four small holes punched in it. I kind of got ahead of myself when I took this picture, so ignore the other blade and washers in the picture.
(6) Now slide the razor back into the jig, but this time line up the small hole with the center of the larger hole.
(7) Take the larger bit and punch it through the razor just like we did with the smaller holes.
(8) Now we have eight washers made from one razor. Notice that the holes on some of the razors are not directly in the center. We are going to fix this in the next few steps.
(9) Let me first try to explain what you are looking at in this picture starting from the left to the right. The first little gray thing is a small collet that fits into my Dremel. You will have to use whatever size collet that fits the size of the pivot pins that you are using. In my case it’s 3/32 inch. Next shown is a small brass tube. The tube is a 1/8 inch tube which has a 3/32 inch center. The tube fits over the shaft that’s seen to the right. Next is a collar that has a 3/32 inch center which also fits over the shaft. These collars are actually wheel collars used on remote controlled airplanes. You can find these at your local hobby shop, or you could make your own if you have a lathe. Then we come to the shaft. The shaft is made out of what ever size pin material you are using. The shaft has a small piece of 1/8 inch tube soldered to its end to keep everything from sliding off. You can see this piece best in the first picture. On this shaft are the washers and the other collar.
(10) This picture shows all of the pieces placed on the shaft. The washers are between the collars, and as you can see, the washers are a little uneven at the edges. The collars will act as guides to even the washers up and to center the holes.
(11) In this picture I have the shaft inserted as far into the Dremel as it will go, and the washers are ready to be spun against the grinder. The 1/8 inch tube stops the shaft from going farther into the Dremel and it keeps everything tight.
(12) I kind of like this picture because it’s an action shot. The Dremel is spinning the washers in the opposite direction of the grinder.
(13) Now that I have finished spinning the washers, notice how they are all even and match the collars. The collars will eventually wear down, so it’s a good idea to have extra ones on hand. I have some old collars that I use when I want to make smaller washers.
(14) The shaft is now apart, and I have my finished washers.
Using The Washers In A Folding Knife
To get the best performance out of the washers, you need to make the blade around .007 inches less than the spring in thickness. This will make the blade and washers about .001 wider than the spring when the knife is together. I also don’t use shims when putting the knife together if I’m using the washers. The blade will be a little bound up at first, but if you oil it and work it for a day or so, the blade will loosen up and the action will be great. I’ve been very satisfied since moving to this method.
I hope the tutorial was informative and enjoyable. Please email me if you have any questions or comments.


